Welcome to the Reemo Documentation
Welcome to the Reemo documentation, the cloud-native platform that secures and simplifies remote access to your sensitive resources. Here you will find all the information you need to install, configure, and efficiently operate Reemo: remote access management, browser isolation, privileged access (PAM/Bastion), integrations, best practices, etc.
Whether you are an administrator, user, or integrator, this documentation guides you step by step to get the most out of Reemo, from getting started to production, ensuring performance, security, and compliance.
About Reemo
Reemo is a high-performance remote desktop protocol accessible through a simple browser, but also a complete ecosystem for remote access and graphical environment management.
Reemo is a platform designed to connect, manage, and integrate your digital environments within a unified and secure interface. It adapts to the needs of end users, IT teams, and infrastructure administrators alike.

Connect
Reemo enables remote connection to a wide range of workstations and operating systems:
Windows
Linux
macOS
This cross-platform compatibility ensures maximum flexibility for end users, wherever they are.
Manage
The platform provides tools to administer and monitor cloud environments, containers, and virtual infrastructures:
Kubernetes, Docker
VDI Proxmox
Public Cloud: Azure, AWS, GCP
With Reemo, administrators can centralize management and enforce consistent policies across all environments.
Integrate
Reemo natively integrates with identity and access management solutions:
Google Workspace
Okta
Microsoft Entra ID
LDAP and other SSO providers
This integration capability simplifies the implementation of advanced authentication and user management scenarios while strengthening security.
Main Use Cases
The Reemo platform centralizes and secures access to work environments, whether desktops, virtualized platforms, or critical applications. The diagram below illustrates the main use cases supported by the solution.
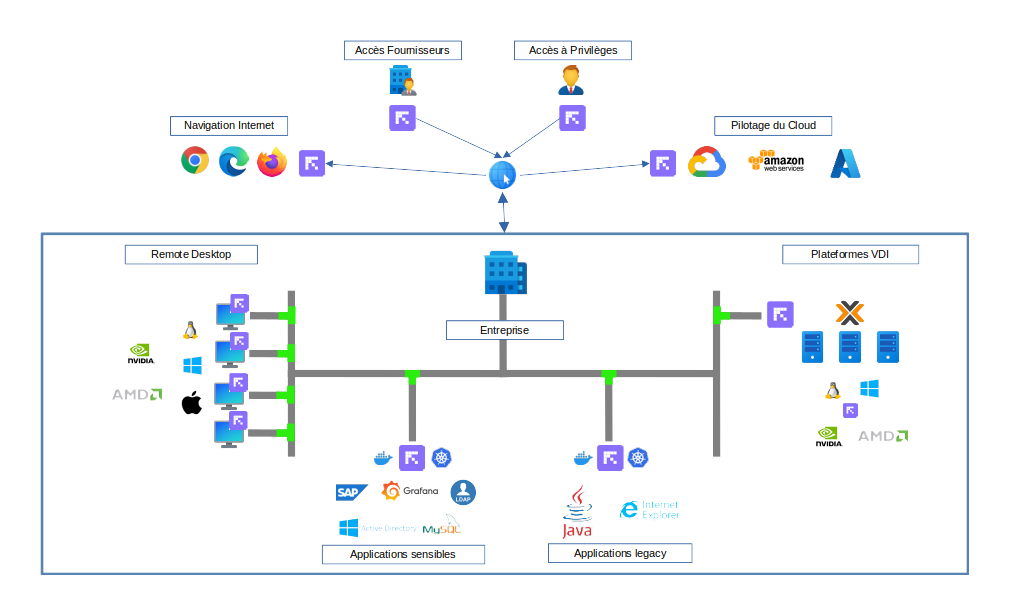
Remote Desktop
Reemo provides smooth and high-performance access to remote desktops running Windows, Linux, or macOS, with advanced GPU support (NVIDIA, AMD). Users can securely connect to their work environment regardless of their access location.
Critical Applications
Business-critical applications (e.g. SAP, Grafana, DevOps or administration tools) can be published via Reemo. Sessions are secured to reduce the risk of data leakage while ensuring an optimal user experience.
Legacy Applications
Reemo also facilitates access to older or specific applications (Java, unsupported browsers like Internet Explorer, etc.) by isolating them in controlled environments. This allows organizations to extend the life of strategic software while improving security.
VDI Platforms
Integration with Proxmox VDI infrastructures is possible to consolidate all access within a single interface. Reemo acts as a centralized control point to simplify management and standardize the user experience.
Cloud Management
Cloud management environments (e.g. AWS, GCP, Azure) can be accessed through Reemo, ensuring secure privileged access for administrators and operators.
Third-Party and Privileged Access
Reemo allows controlled access for external providers or users with elevated privileges, applying strict and traceable security rules.
Secure Web Browsing
Through isolated containers and environments, users can browse the Internet (Chrome, Firefox, Edge) while reducing exposure to external threats.