Configure Relay Servers
Relay servers ensure connectivity between users and their resources (VMs, containers, remote desktops) when a direct WebRTC connection is not possible or when a Websocket transport managed by the platform is chosen.
Two types exist:
TURN servers: fallback WebRTC relays. They can be PUBLIC (accessible to all organizations) or PRIVATE (explicit association required).
Websocket relays: carry the session over a websocket, either as a fallback when WebRTC does not connect or instead of WebRTC. Useful for highly constrained networks. They are private and require explicit association.
This page also covers best practices for correctly configuring URL, SNI, Base URLs, and certificates.
TURN Servers
TURN servers relay the WebRTC stream when peer-to-peer establishment fails (strict NAT, firewall, proxy). They ensure reliability at the cost of higher latency compared to direct connections.
Access: verified_user Admin Area > shield Network & Security > cast TURN Relays.
Create a TURN server
Open verified_user Admin Area > shield Network & Security > cast TURN Relays, then click + New TURN Relay.
Fill in the form fields.
Click Create.
Form Fields
Name: internal identifier (e.g., TURN1).
Visibility: PUBLIC or PRIVATE.
Host: FQDN or IP of the TURN server.
Port: listening port (commonly 443).
Authentication: authentication mode for the TURN server.
Username and password: all clients receive the same credentials, which never change.
Shared secret: the API derives a credential valid for 24 hours from this secret, per connection. The TURN server must run in
use-auth-secretmode.
Note
The shared secret is never sent to the client: only your TURN server and Reemo know it. For each connection, Reemo derives a temporary credential from it, valid for 24 hours. Unlike a fixed username and password shared by every client, this method limits the impact of a leak: generated credentials expire quickly and are never reused.
Associate a private TURN server
A TURN server can have 2 visibility statuses in the platform:
PUBLIC: available to all organizations.
PRIVATE: must be explicitly associated with an organization.
This association is done from the organization’s settings — see TURN Servers. From a relay server’s profile, you can see which organizations are currently associated with it.
TURN best practices
Prefer port 443 to bypass corporate proxies.
Segment by environment or organization using PRIVATE visibility and targeted associations.
Websocket Relays
Websocket relays carry a session over a websocket, as a fallback to WebRTC or instead of it. A websocket gets through networks that block WebRTC (strict firewalls, proxies), at the cost of lower performance. They are useful in highly constrained networks.
Access: verified_user Admin Area > shield Network & Security > settings_ethernet Websocket Relays.
To set up a relay:
Check Websocket Relays Enabled in the Global Settings.
Associate it with a container provider or an organization.
If the relay is optional for containers, or if the provider has several relays, set it on each container profile.
Relay types
SWARM and KUBERNETES: Reemo deploys a mini relay container on the cluster for each connection and removes it at the end of the session.
Shared (one relay for every session): a single relay process, always running, pairs all the sessions itself. Nothing is started per connection, so one server serves several users.
Relay mode
The Relay mode of an organization sets how its sessions use the relay:
Always use the relay (disables WebRTC): every session goes through the relay.
WebRTC first, relay as a fallback: the session first tries a direct WebRTC connection and switches to the relay only if it does not connect within 10 seconds.
In the second mode, Reemo tests whether WebRTC works on the user’s network at the first connection. If it does not, the session goes through the Websocket relay, and a notification tells the user that WebRTC is unavailable. Reemo does not test WebRTC again in the same browser for 24 hours.
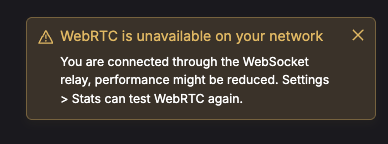
Notification shown to the user when the session switches to the Websocket relay.
Websocket performance is lower than WebRTC, but the connection is more robust. Users can see that their session goes through the relay in the Stats tab of the toolbar, and test WebRTC again from there.
Create a Websocket relay
Open verified_user Admin Area > shield Network & Security > settings_ethernet Websocket Relays, then click + New Websocket Relay.
Select the Type, then fill in the form fields.
Click Create.
Once the relay is created, you can test it from the Websocket relay list using the Test button.
Note
The Test button checks that the relay server is reachable and, for the SWARM and KUBERNETES types, that it can provision containers. A green Success or red Failed badge then appears next to the button depending on the result.
Form Fields
For the SWARM and KUBERNETES types:
Type: target engine (SWARM or KUBERNETES).
Name: internal relay identifier.
URL: cluster URL to contact to create the relay mini-containers.
Server Name (SNI): server name expected in the SSL certificate presented by the relay.
Relay IP Addresses: fallback IPs if the relay is unreachable via DNS (comma-separated list).
Websocket Base URL: public URL used by the users’ browser.
Status Base URL: status URL called by the provisioning API to know when the relay is ready.
HAProxy stats port: port exposing HAProxy statistics (
8404by default). Used by the node diagnostic.Certificate: choose to use an existing certificate, then select it from the list.
For the Shared type:
Name: internal relay identifier.
Websocket URL: address the users’ browser connects to, for example
wss://relay.example.com.Websocket URL for agents: only when the agents reach the relay at another address, for example
wss://relay.internal:8070.Status URL: address that answers
/health, usually the same host overhttps.Relay IP Addresses: fallback IPs if the relay is unreachable via DNS (comma-separated list).
Secret: generated by Reemo. Start the
websocket-relayprocess with this value inRELAY_SECRETS.
Attention
The Secret is shown only once, when you create the relay. Copy it before you click Create.
Associate a Websocket relay
A relay can be associated with a container provider or with an organization. From a relay server’s profile, you can see which organizations are currently associated with it.
With a container provider
Go to verified_user Admin Area > view_in_ar Containers & Workstations > dns Container Providers and click the provider’s Name.
Open the Websocket Relay tab, then click Add Websocket Relay.
Select the relay, then click Add.
To remove a relay from the provider, click Remove next to it in the list.
If the provider has a single relay, it is used for all the provider’s containers. If it has several, a relay must be selected on each container profile associated with the provider (see below).
With an organization
Go to verified_user Admin Area > domain Organizations.
Select the desired organization.
Click admin_panel_settings Administration > settings_ethernet Websocket Relay.
Check Enable Websocket Relay, then select the Relay to use.
Choose the Relay mode.
Click Save.
The relay then applies to all the resources of the organization, computers and containers.
Note
By default, the relay applies to all containers in the organization. Check Optional for containers to make it optional instead: it will then need to be enabled manually on each container profile (see below).
Important
If a container provider and an organization have different relays, the provider’s relay is used first.
Use the relay on a container profile
When Optional for containers is checked on the organization, enable the relay on each container profile that needs it:
Go to inventory_2 Inventory > box_edit Container Profiles and click the profile’s name.
Click Edit.
In the Settings step, check Use organization WebSocket relay.
Click Update.
Its containers then use the relay configured on the organization.
If the profile’s container provider has several relays, the Settings step shows two other fields instead: Websocket Relay, to select the relay of the profile, and Websocket relay mode, to choose how the profile’s containers use it.
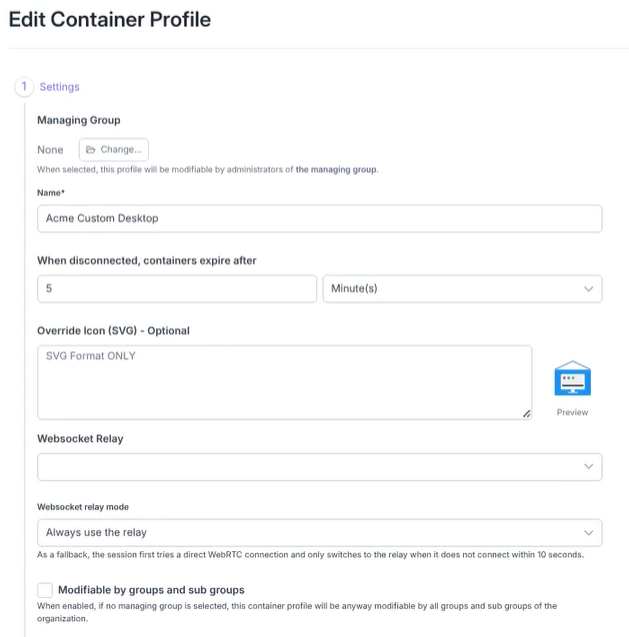
Settings step of a container profile, when the provider has several relays.
Websocket best practices
For the SWARM and KUBERNETES types:
Websocket Base URL must be public, stable, and covered by the certificate.
Configure SNI to secure client-side TLS validation.
Size the target cluster to handle the on-demand creation of mini-containers.
For all types, use Relay IP Addresses only as a fallback.
See also
Securing Your Instance — Overview of the controls that protect your instance.