Reemo Toolbar
The Reemo toolbar gives you access to a set of essential features to enhance your remote desktop experience. By default, it is displayed at the top of your session and groups the main controls.

Overview of the Reemo toolbar under optimal connection conditions (direct/udp).
Connection Type
A specific icon appears in the toolbar to indicate the connection status:
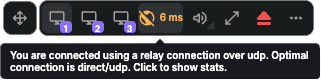
Example of a relay/udp connection, indicated as non-optimal.
- Possible connection types:
direct/udp → Optimal connection (low latency, high performance).
relay/udp → UDP relay connection, used if direct/udp is not possible.
relay/tcp → TCP relay connection, slower and more sensitive to packet loss.
relay/websocket → Fallback connection, used only if others are not available.
- The color of the latency indicator reflects the connection status:
🟢 Green: optimal direct connection (direct/udp).
🟠 Orange: connection via a relay (relay/udp, relay/tcp, or websocket).
Toolbar Icons
- From left to right, the toolbar includes the following icons:
Move toolbar: allows repositioning the toolbar on the screen.
Screen selection: appears only if multiple monitors are connected to the remote machine. Each icon corresponds to a monitor and allows switching the display.
Latency: displays the connection delay (in ms). The color indicates the type of connection (green for direct, orange for relay).
Peers list: Displays users connected to the session simultaneously. Allows disconnecting a user or enabling/disabling their mouse and keyboard access.
Microphone/webcam selection: appears when a remote application requests access to the microphone or webcam. Allows choosing which physical device to use.
Volume control: adjust the remote session’s audio volume.
Fullscreen mode: switch to fullscreen view.
Disconnect: end the remote session.
Configuration menu: access advanced settings and additional options.
Microphone and Webcam Selection (Windows and Linux)
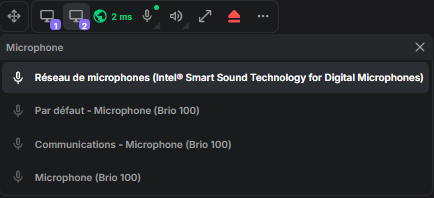
Microphone selection menu.

Webcam selection menu.
This menu appears automatically when an application on the remote machine requests access to the microphone or webcam (for example, during a video conference). It allows you to choose which physical device to use among those available on the client machine — useful if multiple microphones or webcams are connected.
The behavior is identical for audio and video: each access request opens the corresponding menu (Microphone or Webcam), which lists the detected devices and highlights the one currently selected.
Note
This menu is displayed only when the remote application requests permission: it is not part of the toolbar’s permanent settings.
Important
This menu is available only when the remote machine runs Windows or Linux (not available for a macOS remote machine).
When an application on the remote machine prompts you to choose a device, select Reemo virtual microphone or Reemo virtual webcam.
Volume Control
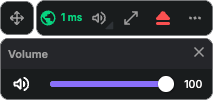
Volume control menu.
The volume control menu allows adjusting the audio volume sent from the remote machine.
Configuration Menu
To open the configuration menu, click on the three dots (⋯) at the far right of the toolbar.
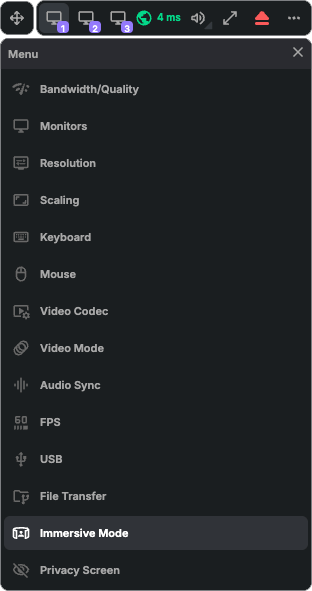
Reemo toolbar configuration menu.
Quality/Bandwidth

Bandwidth selection menu.
- Allows adjusting the quality of the video stream to match your bandwidth.
2 Mbps - Low Quality: Low bandwidth, high compression artifacts.
5 Mbps - Low Quality: Mobile connection, visible compression artifacts.
7 Mbps - Medium Quality: ADSL connection (Default).
10 Mbps - Medium Quality: Stable Wi-Fi connection.
20 Mbps - High Quality: Fiber connection.
40 Mbps - High Quality: Good fiber connection.
80 Mbps - Ultra Quality: Very good fiber connection.
200 Mbps - Ultra Quality: Local connection.
Note
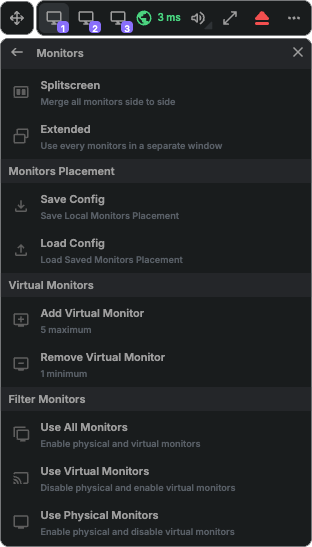
Monitor Management
Monitor management menu.
Allows configuring multi-monitor display and virtual monitors.
- Monitors
Splitscreen: Combines all remote monitors side by side in a single window.
Extended: Displays each remote monitor in a separate window.
- Monitors Placement:
Save Config: Saves the current layout of your local monitors (in extended mode).
Load Config: Loads a saved monitor layout and applies the configuration.
- Virtual Monitors (Ecrans virtuels) (Windows et macOS)
Add Virtual Monitors : Adds virtual monitors.
Windows : Up to 5 monitors maximum.
macOS : No fixed limit (depends on machine performance).
Remove Virtual Monitors : Removes virtual monitors.
Windows : Minimum of 1 virtual monitor required.
macOS : Minimum of 0 (minimum of 1 if the remote Mac is headless).
- Filter Monitors: (Windows only)
Use all monitors: Enables all monitors (physical and virtual).
Use Virtual Monitors: Disables physical monitors and uses only virtual ones.
Use Physical Monitors: Disables virtual monitors and uses only physical ones.
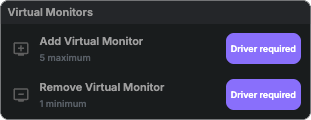
Menu indicating that the virtual monitor driver is not installed on the remote machine.
Note
If the Add/Remove Virtual Monitors buttons show a Driver required badge, the virtual monitor driver is not installed on the remote machine. Follow the instructions in the Virtual Displays section to install it.
Screen Resolution
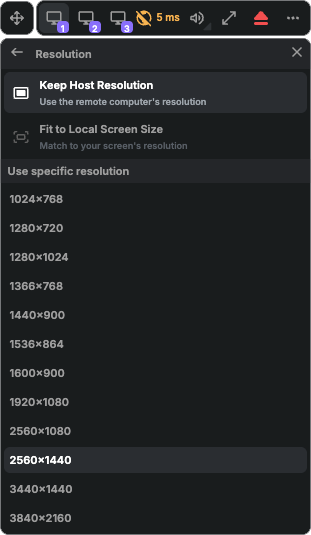
Resolution selection menu.
Adjusts the resolution of the remote desktop display to match your screen.
Keep Host Resolution: Keeps the current resolution of the remote computer.
Fit to Client Resolution: Adapts the remote resolution to the size of your local window.
Use specific resolution: Forces a specific resolution (1024x768, 1280x720, etc.).
Note
Scaling
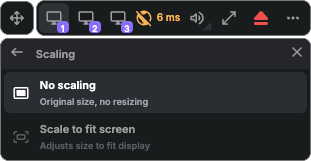
Scaling selection menu.
Defines how the remote image is scaled to fit your local window.
No scaling: Displays the image at its original size, without resizing (if the remote resolution is lower than your local screen, you will see black borders around the display).
Scale to fit screen: Adjusts the image size to fill your display (useful if the remote resolution is lower than your local screen, but may cause some blurriness. For best results, use a resolution adapted to your screen, see Screen Resolution).
Keyboard Settings
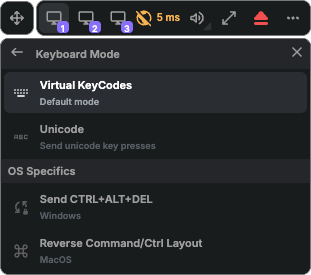
Keyboard settings menu.
This section allows configuring keyboard behavior and how special keys are sent to the remote machine.
- Keyboard Mode
- Virtual KeyCodes (default): Sends the physical key code (its position on the keyboard).
- Example: if your local keyboard is AZERTY and the remote machine is QWERTY, pressing the A key locally will send a Q to the remote machine.This mode is useful if you want to reproduce the physical layout of your keyboard, regardless of the language or remote mapping.
- Unicode: Sends the Unicode character corresponding to the pressed key directly.
- Example: typing A on an AZERTY keyboard will send an A, even if the remote machine is configured as QWERTY.This mode is particularly useful when keyboard layouts differ (AZERTY ↔ QWERTY, or other non-standard layouts), or when using keyboards with specific system differences (Windows ↔ macOS, custom keyboards, etc.).
Warning
- OS Specifics:
Send CTRL+ALT+DEL: Sends the Ctrl + Alt + Delete combination to the remote machine. Mainly used on Windows (e.g., open Task Manager or access the security screen).
Reverse Command/Ctrl Layout: Reverses the behavior of the Command (⌘) and Control (Ctrl) keys when using a macOS keyboard connected to a remote machine. Useful to avoid confusion between macOS and Windows keyboard shortcuts.
Mouse Settings
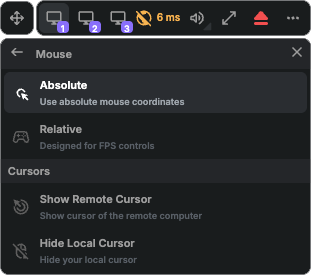
Mouse settings menu.
Adjusts mouse modes (absolute/relative) for better interaction.
- Mouse:
Absolute: Uses the absolute coordinates of the mouse. Provides better precision during movements and is recommended for most standard uses.
Relative: Uses the relative movements of the mouse (instead of position). Designed for video games, especially FPS, where continuous and fluid movements are essential.
- Cursors:
Show Remote Cursor: Displays the remote computer’s cursor. Particularly useful when multiple people are on the same machine: without this option, the remote user cannot see the local user’s cursor.
Hide Local Cursor: Hides your local cursor (to be used together with Show Remote Cursor). Particularly useful for graphic tablet users to counter latency: only the real position of the remote cursor is shown, not the slightly delayed local one.
Important
If you are connected to a Windows machine and cannot see the cursor, it means no mouse is physically connected to the PC. To fix this issue, either plug in a mouse or enable Mouse Keys in Windows (Settings > Accessibility > Mouse > Mouse keys).
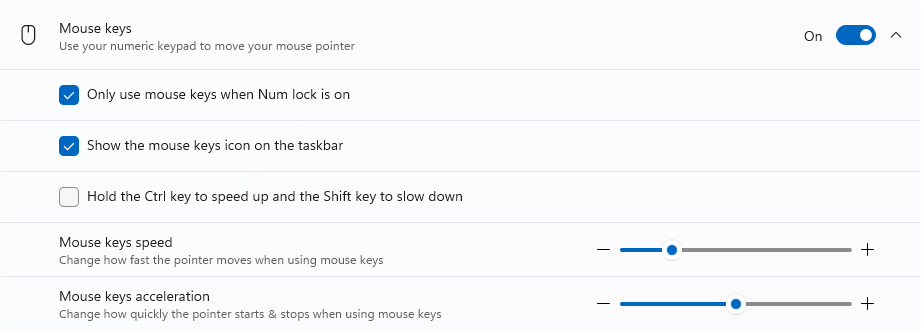
Enabling Mouse Keys in Windows.
Video Codec
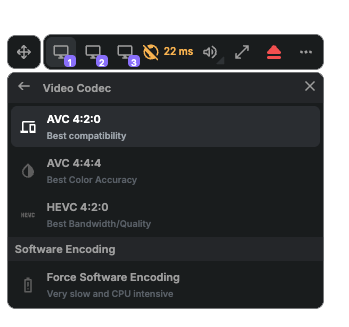
Video codec selection menu.
Allows choosing the video codec to optimize compatibility or image quality.
- Video Codec
AVC 4:2:0: A widely used codec, ensuring broad compatibility with most devices.
AVC 4:4:4: Provides better color fidelity, ideal for content with lots of text or detailed graphics.
HEVC 4:2:0: A more recent codec offering better compression (higher quality at equivalent bitrate), but may require more powerful hardware for decoding.
- Software Encoding
Force Software Encoding: Forces video encoding to be performed by the CPU, even if hardware encoding is available.
Note
10-bit displays: for compatibility, Reemo automatically converts the video stream to 8-bit (tone-mapping).
HDR on macOS: tone-mapping produces correct color rendering; color depth is still limited to 8-bit.
Warning
HDR on Windows: not yet supported. If HDR is enabled on the remote machine’s display, colors may appear distorted (bright tones near-white, dark tones crushed). Disable HDR on the remote machine for correct color rendering.
Video Mode
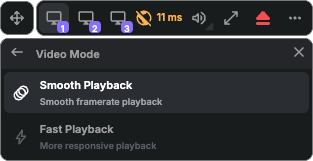
Video mode selection menu.
Switches between video modes to optimize display for work or multimedia.
Smooth Playback: Prioritizes smooth playback and a stable framerate. A small buffer is used to avoid frame loss. Recommended for daily use.
Fast Playback: Prioritizes low latency and better responsiveness. Frames are displayed as soon as they are received, which may result in some frame drops but reduces latency. Ideal for tasks requiring real-time precision, such as video editing.
Audio Sync

Audio sync selection menu.
Adjusts synchronization between audio and video for a smooth experience.
Disabled: Performs no synchronization: audio and video play independently. Recommended if minimal latency is the priority or if you do not notice any desync.
Enabled: Synchronizes video to audio to avoid desync. A small buffer may be added to ensure both streams remain aligned. Recommended for a smooth multimedia experience (movies, video calls, presentations).
Frames per Second (FPS)
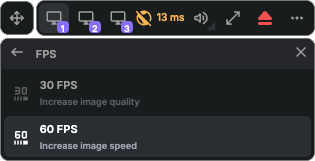
FPS selection menu.
Defines the number of frames per second for the video stream, prioritizing either smoothness or image quality.
30 FPS: Prioritizes image quality.
60 FPS: Prioritizes motion smoothness.
120 FPS: Prioritizes maximum responsiveness.
USB
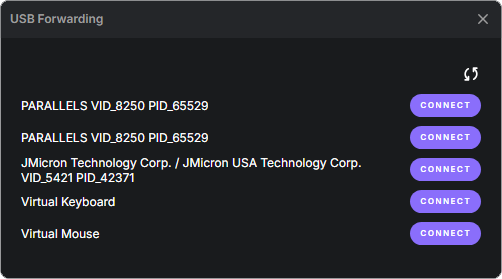
USB device management menu.
Allows managing the transfer of local USB devices to the remote machine. Useful for using specific peripherals on the remote machine.
Note
The virtual USB driver must be installed on the remote machine (see USB Passthrough).
File Transfer
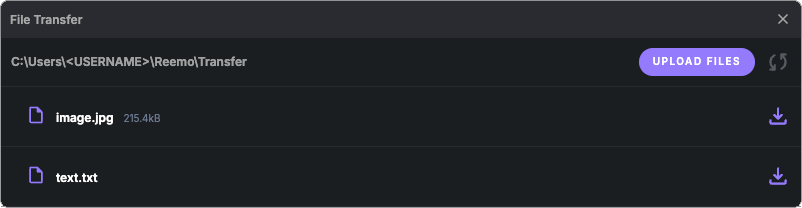
File transfer management menu.
Allows transferring files between the local machine and the remote machine (download and upload).
Note
Configuration depends on the environment:
Classic machines: from your organization’s portal, enable file transfer in the machine settings (inventory_2 Inventory > tv Remote Desktops > Edit > Security).
Containers: enable file transfer in the container profile (see Profile Configuration).
Files in the dedicated transfer directory appear automatically in the menu — uploaded files are saved there as well. Each entry displays the file’s size and creation time, and can be permanently deleted using the (![]() ) button.
) button.

Delete confirmation dialog.
Immersive Mode
Disabling it displays a border around the Reemo window, useful to quickly know whether you are working locally or remotely.
Privacy Screen (Windows only)

Enabling Privacy Screen from the toolbar configuration menu.

Box indicating that Privacy Screen is active.