Contents Menu Expand Light mode Dark mode Auto light/dark, in light mode Auto light/dark, in dark mode Skip to content
Reemo documentation
Light Logo Dark Logo
  • About Reemo

Getting Started

  • Quickstart
  • Reemo Agent
    • Installation
    • Configuration
    • Reemo Support
    • Additional Drivers
    • Restart the Agent
    • Update
    • Uninstallation

Portal & Session

  • User Interface
    • Resources Dashboard
    • My Approvals
    • Account Settings
    • Notifications
  • Reemo Toolbar
    • General
    • Display
    • Mouse & Keyboard
    • USB
    • File Transfer
    • Diagnostics

Administration

  • Manage your Organization diamond
    • Interface Tour
    • General
      • Overview
      • Activity (Sessions)
      • Security Logs
      • General Settings
        • Security Settings
        • Configure Wake-On-LAN
      • Configure Remote Experiences
      • Configure SSO
    • Inventory
      • Manage Users
        • User Roles
      • Manage Workstations
      • Manage Composites
      • Container Profiles
        • Container Placement Constraints
        • Configure File Transfer
      • Collections
      • Containers
      • Access Requests
      • Rights Review
      • Configure Usage Schedules
      • Manage Credentials
      • Manage Groups and Roles
        • Group Settings
  • Administer Your Instance diamond
    • Getting Started
    • General
      • Overview
      • Manage Users
      • Manage Organizations
      • Monitor Computers and Containers
      • Configure Instance SSO
    • Containers & Workstations
      • Configure Cloud Providers
      • Manage VM Templates
      • Configure Container Providers
        • Create a Direct Container Provider
        • Manage Provider Resources
        • Associate a Private Provider with an Organization
      • Manage Container Provider Schedules
      • Container Images
        • Image Details
        • Configuration Variables
      • Manage Container Blueprints
    • Credentials
      • Configure Credential Providers
      • Manage Credentials
    • Network & Security
      • Configure Relay Servers
      • Manage Certificates
      • Security Logs
    • System
      • Health Checks
        • Node Diagnostics
      • Service Versions
      • Manage Access Links
      • Overview
      • Creating an Announcement
      • Configure Your Instance
      • Bundled Terms of Service

How-to Guides

  • Network Guides
    • Use the Connectivity Test Page
    • Network Matrix (Public Cloud)
    • Network Matrix (Private Cloud)
    • Configure a Fortinet Firewall
    • Configure a Juniper Firewall
    • Configure a SonicWall Firewall
    • Configure a pfSense Firewall
  • SSO Guides
    • Configure an LDAP Connector
    • Configure SAML with Microsoft Entra ID
    • Configure SAML with Okta
    • Configure SAML with Keycloak
    • Configure SAML with Authentik
    • Configure OIDC with Keycloak
    • Configure OIDC with Authentik
    • Configure OIDC with Microsoft Entra ID
    • Configure OIDC with Okta
  • Appliance Guides
    • Deploy a Container Appliance
    • Provision the Appliance
      • Deploy a Standard Appliance
      • Deploy an Advanced Appliance
      • Appliance Operations and Maintenance
  • Peripherals
    • Forward a USB device
    • Configure Reemo on a Microsoft Hybrid (Dual-GPU) System

Resources

  • Plans & Licensing
    • Plans
    • Licensing
  • Release Notes
  • Reemo Thin Client
  • Troubleshooting
    • Troubleshooting the Reemo Agent
    • Troubleshooting Virtual Displays
    • Troubleshooting USB Forwarding
    • Error Codes
Back to top

Manage Access Links

Access links are stable URLs that point to a composite or a machine. Opening a link’s URL on a device associates that device with the link, and the user lands on the target once connected. The target can be edited from this page or through the Integration API.

This is typically used for kiosk-style setups, such as a thin client that must always land on the same machine.

Note

Opening an access link still requires the connecting user to have the necessary permissions on the target resource.


Access: verified_user Admin Area > build System > link Access links.


Overview
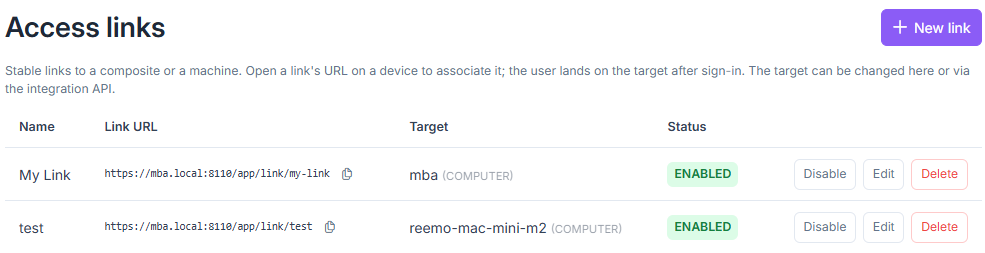
../../_static/images/instance/access-links/instance_access_links_list_en.png

Access links page

Each access link displays the following information:

  • Name: the link’s label

  • Link URL: the static URL to open on a device to connect it to the target — use the copy icon (content_copy) to copy it

  • Target: the resource the link points to, with its type in parentheses (e.g. COMPUTER, COMPOSITE)

  • Status: ENABLED or DISABLED

  • Enable / Disable: temporarily deactivate a link without deleting it — a disabled link’s URL no longer connects to its target

  • Edit: change the link’s name, slug, or target

  • Delete: permanently remove the link

Creating an Access Link

  1. Go to verified_user Admin Area > build System > link Access links.

  2. Click New link.

  3. Fill in the form:

    • Name (required): a label to identify the link.

    • Link slug: used in the link’s URL. Leave empty to auto-generate a readable code (e.g. bhb-zsfi-oyi). Lowercase letters, digits and hyphens only.

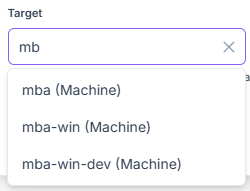
    • Target: the resource the link opens. Start typing in the search field to find a composite or a computer — matching results appear below the field as you type. Leave empty to set it later, for example through the Integration API.
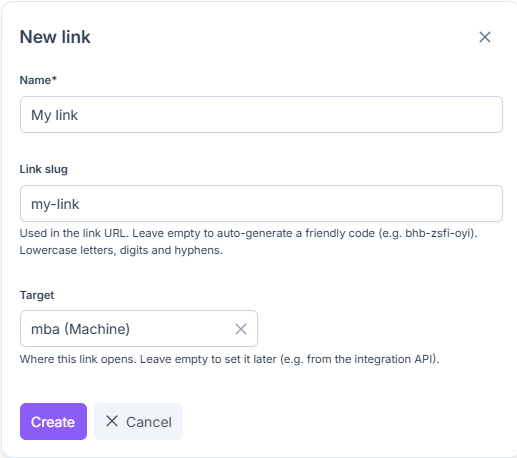
../../_static/images/instance/access-links/instance_access_links_create_en.png

Access link creation form

../../_static/images/instance/access-links/instance_access_links_target_search_en.png

Searching for a target while creating a link

  1. Click Create.

Once created, share the link’s URL with the users who need to connect directly to the target resource — they will still need the appropriate permissions on it to open the connection.

Next
Overview
Previous
Service Versions
Copyright © 2026, Reemo
Made with Sphinx and @pradyunsg's Furo
On this page
  • Manage Access Links
    • Overview
    • Creating an Access Link