Display
The Display tab of the Settings panel configures multi-monitor layout, resolution, and scaling.
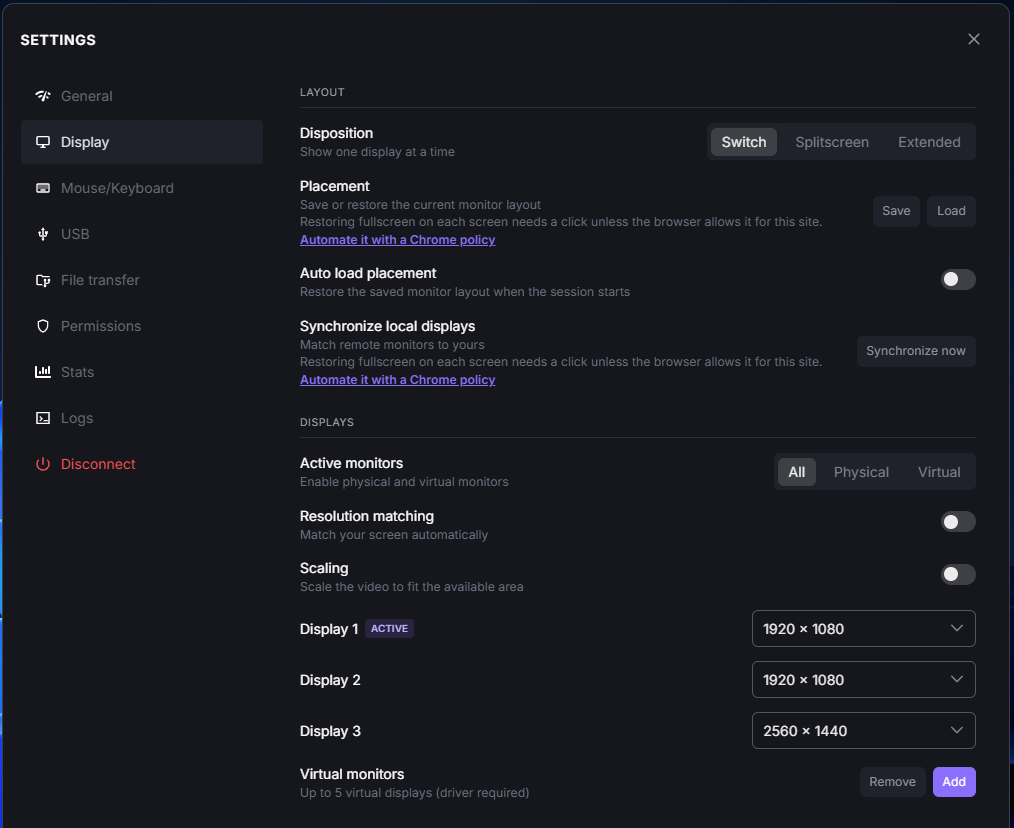
Settings panel, Display tab.
Layout
Disposition
Controls how remote monitors are displayed on your local screen:
Switch: shows one remote display at a time.
Splitscreen: combines all remote monitors side by side in a single window.
Extended: displays each remote monitor in a separate window.
Tip
To move a window from one remote display to another, switch to Splitscreen mode, then drag and drop the window onto the target display.
Placement
Save: saves the current layout of your local monitors (in extended mode).
Load: loads a previously saved monitor layout and applies the configuration.
Note
Restoring fullscreen on each screen requires a click, unless your browser allows it for this site — see Automate it with a Chrome policy to configure this automatically for all users through a Chrome enterprise policy.
Auto Load Placement
When enabled, the layout saved with Save is restored automatically as soon as the session starts, without needing to click Load every time.
This is the same setting as the organization-level Load monitor layout on connect default for Remote Experience profiles — see Configure Remote Experiences.
Synchronize Local Displays
Click Synchronize now to match the remote monitors to your local ones — same resolutions, same arrangement — instead of configuring them manually one by one.
Note
Restoring fullscreen on each screen requires a click, unless your browser allows it for this site — see Automate it with a Chrome policy to configure this automatically for all users through a Chrome enterprise policy.
Note
Placement, Auto Load Placement, Synchronize Local Displays, and the Resolution Matching / Scaling options are intentionally separate, fine-grained controls for different use cases. Choose the one that fits your situation.
Displays
Active Monitors — Windows only
Chooses which monitors are used for the session:
All: enables both physical and virtual monitors.
Physical: uses only physical monitors.
Virtual: uses only virtual monitors.
Resolution Matching
When enabled, the remote display resolution automatically matches your local screen. When disabled, you can set a specific resolution for each display individually (see below).
Note
Scaling
When enabled, the remote image is scaled to fill the available area — useful if the remote resolution is lower than your local screen, though it may cause some blurriness. For the best result, prefer matching the resolution instead of scaling.
Per-Display Resolution
Each connected display is listed individually (for example, Display 1, marked ACTIVE for the display currently in use), with a dropdown to force a specific resolution for that display (for example, 2560 x 1440). This only applies when Resolution Matching is disabled.
Virtual Monitors
Adds or removes virtual monitors on the remote machine:
Add: adds a virtual monitor. Up to 5 virtual displays are supported. A new virtual monitor is always placed to the right of the previous display.
Remove: removes a virtual monitor.
Note
Availability depends on the remote machine’s operating system:
Windows: requires the virtual monitor driver to be installed. If it is not installed, the buttons are marked Driver required — follow the instructions in the Virtual Displays section to install it.
macOS: supported natively, no driver installation needed.
Linux: supported with no extra installation on Intel and AMD graphics, within the limit of the free outputs of the graphics card. NVIDIA graphics require the EVDI module — follow the instructions in the Virtual Displays section to install it.
Back to the Settings panel overview.