General
The General tab of the Settings panel groups video quality options and overall toolbar behavior.
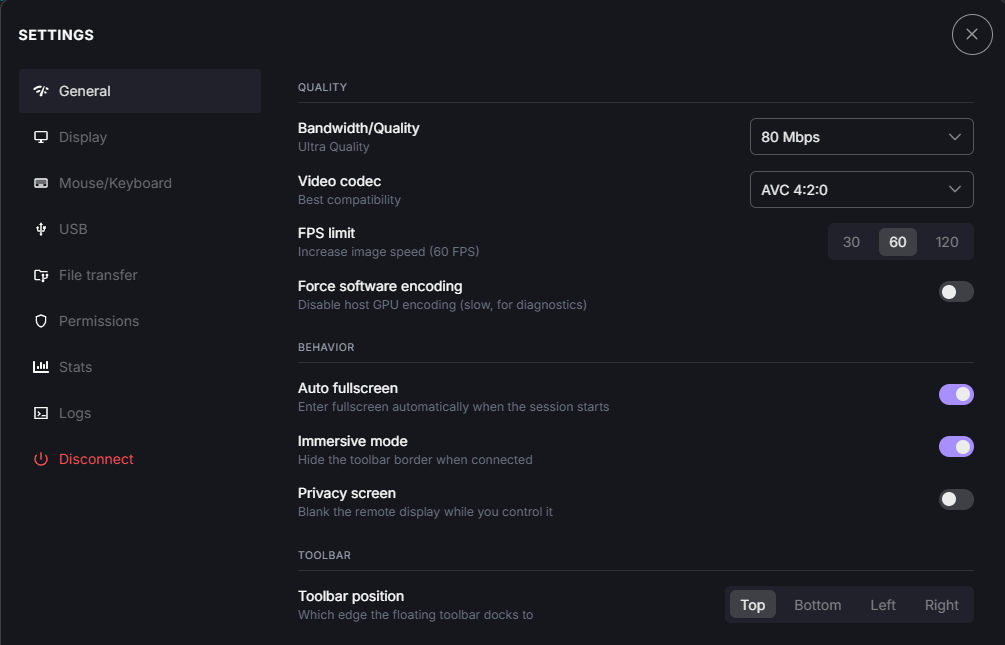
Settings panel, General tab.
Quality
Adjust how the video stream is encoded and sent to your screen.
Note
Some settings in this section need an up-to-date Reemo Service (the Reemo agent) on the remote computer (see Update). When it is too old, a warning icon warning appears next to the setting: update the Reemo Service to use it.
Maximum Bandwidth
Caps the bitrate of the video stream: it never goes above the value you choose.
Automatic: Reemo adjusts the bandwidth to your screens and your connection (see Automatic Mode).
2 Mbps: Low bandwidth, high compression artifacts.
5 Mbps: Mobile connection, visible compression artifacts.
7 Mbps: ADSL connection.
10 Mbps: Stable Wi-Fi connection (default).
20 Mbps: Fiber connection.
40 Mbps: Good fiber connection.
80 Mbps: Very good fiber connection.
200 Mbps: Local connection.
Note
Automatic Mode
With a fixed value, you have to guess what your connection can carry. In Automatic mode, Reemo chooses the cap for you and adjusts it during the session:
At the start: the cap is sized to the streamed screens. The more pixels (resolution, number of screens) and the higher the frame rate, the higher the cap.
On a congested network: when the connection starts dropping video packets, the cap goes down within a few seconds to keep the stream fluid.
When the network recovers: the cap goes back up on its own.
The field then shows the cap currently in use (for example Adapts to your screens and network, 12.0 Mbps now). The measured cap is not saved: each session starts over, but your choice of Automatic is remembered.
Automatic mode also keeps to the limits that apply to you: the bandwidth limit of your plan, the bounds set by your organization in a Remote Experience, and the technical caps of the connection (200 Mbps direct, 60 Mbps through a relay, 60 Mbps per screen).
Note
Important
Automatic needs a WebRTC connection and a Reemo Service that sends the video over RTP (see Update). If one of these conditions is not met (older Reemo Service, WebSocket relay, multi-computer session), Automatic is not available and the session uses 10 Mbps by default.
Priority
Choose what gives way first on a slow network:
Smoothness: keeps the frame rate and accepts visible compression artifacts on a slow network.
Quality: keeps the image sharp and lets the frame rate drop instead.
Note
Quality requires an up-to-date Reemo Service on the remote computer and a WebRTC connection.
Quality Level
Choose a level from 1 to 5: the higher the level, the sharper the image. This setting is available only when Priority is set to Quality.
Video Codec
Allows choosing the video codec to optimize compatibility or image quality.
AVC 4:2:0: A widely used codec, ensuring broad compatibility with most devices (best compatibility).
AVC 4:4:4: Provides better color fidelity, ideal for content with lots of text or detailed graphics.
HEVC 4:2:0: A more recent codec offering better compression (higher quality at equivalent bitrate), but may require more powerful hardware for decoding.
Note
10-bit displays: for compatibility, Reemo automatically converts the video stream to 8-bit (tone-mapping). The exception is static images with Build to Lossless and 10 bits: see Color Depth.
HDR on macOS: tone-mapping produces correct color rendering; color depth is still limited to 8-bit.
Warning
HDR on Windows: not yet supported. If HDR is enabled on the remote machine’s display, colors may appear distorted (bright tones near-white, dark tones crushed). Disable HDR on the remote machine for correct color rendering. The exception is Build to Lossless with 10 bits: see Color Depth.
Build to Lossless
When enabled, the static areas of the screen become lossless, for sharp text and exact colors.
Color Depth
Choose the color depth for static screen areas. This setting is available only when Build to Lossless is enabled.
8 bits (default)
10 bits: static images can be displayed in 10 bits, for smooth gradients without banding. Moving content, such as a video, stays in 8 bits.
This makes 10 bits best suited to professional color work, such as colorimetry or video retouching, rather than watching content. On Windows, Build to Lossless also supports HDR in 10-bit mode.
To display 10 bits, both ends need a 10-bit display configured for 10-bit output:
Remote machine: enable 10-bit output. With an NVIDIA GPU on Windows, open the NVIDIA Control Panel, go to Display > Change resolution, select Use NVIDIA color settings, then set Output color depth to 10 bpc.
Your computer: use a 10-bit display, also configured for 10-bit output. An HDR display is not necessarily 10-bit.
Note
10 bits is not available yet on virtual monitors (Reemo virtual display driver).
FPS Limit
Sets the maximum number of frames per second for the video stream, prioritizing either smoothness or image quality.
30 FPS: Prioritizes image quality.
60 FPS: Prioritizes motion smoothness (default).
120 FPS: Prioritizes maximum responsiveness.
Force Software Encoding
Forces video encoding to be performed by the CPU, even if hardware (GPU) encoding is available on the remote machine. This disables host GPU encoding and is slower — use it only for diagnostics, for example to rule out a GPU encoder issue.
Behavior
Set how the session starts and how it is displayed on your computer.
Auto Fullscreen
When enabled, the session automatically enters fullscreen mode as soon as it starts, without requiring a manual click on the Fullscreen mode toolbar icon.
Immersive Mode
When enabled, no border is displayed around the Reemo window while connected. Disable it to display a border around the window, useful to quickly know whether you are working locally or remotely.
Privacy Screen (Windows and macOS only)

Box indicating that Privacy Screen is active.
Note
On Windows, an administrator can hide this box with the watermark option of the Agent configuration.
Toolbar
Choose where the toolbar sits on the screen and when it is shown.
Toolbar Position
Sets which edge of the screen the floating toolbar docks to: Top, Bottom, Left, or Right.
Toolbar Behavior
Choose how the toolbar behaves during a session:
Slide out (default): the toolbar slides out when idle and leaves a handle on the edge of the screen to bring it back.
Always visible: the toolbar stays on screen.
Hidden: the toolbar is hidden. A message confirms it and reminds you that Ctrl+Alt+B (Ctrl+Option+B on macOS) shows it again.

Handle left on the edge of the screen when the toolbar has slid out.
Back to the Settings panel overview.