Network policies
Limit what Kubernetes containers can reach and what can reach them, like a firewall per container.
Access: from verified_user Admin Area > view_in_ar Containers & Workstations > dns Container Providers, select a Kubernetes provider, then open the Network policies tab.
A network policy limits the outgoing and incoming traffic of a container. Without a policy, a container reaches any address and receives traffic from anywhere, and Reemo applies no policy by default. For example, a policy can cut the Internet access of a contractor’s containers, or isolate a workstation that handles sensitive data.
Each policy belongs to a provider. The instance administrator creates it in the provider page (see Manage Provider Resources), then turns it on in the container blueprints or in the profiles created without a blueprint that use this provider. The policies of a profile add up: a destination allowed by one of them is allowed.
Prerequisites
The provider must be of Kubernetes type.
Cilium on the clusters of the provider, for domain names and
CiliumNetworkPolicyobjects. Reemo refuses to save the policy if a cluster that answers does not have Cilium.Without Cilium, nothing guarantees that the cluster enforces standard
NetworkPolicyobjects: check that its network supports them.On a cluster provided by the customer, a Reemo account that can manage
networkpolicies(networking.k8s.iogroup) and, with Cilium,ciliumnetworkpolicies(cilium.iogroup) in its namespace, with theget,list,watch,create,update,patchanddeleteverbs.
Create a policy
In the provider page, open the Network policies tab, then click New policy.
Fill in the form fields (see Form fields).
Click Save.
If the policy uses a domain name and no cluster of the provider answers, Reemo only checks its form. The window that opens after you save says so: “Only its form was checked: no reachable cluster to check it.”
The policy list shows, for each policy, whether its outgoing and incoming traffic is restricted, the Cilium tag (it needs Cilium) and the Site name checked tag (the site name check is on), and the number of blueprints and profiles that use it.
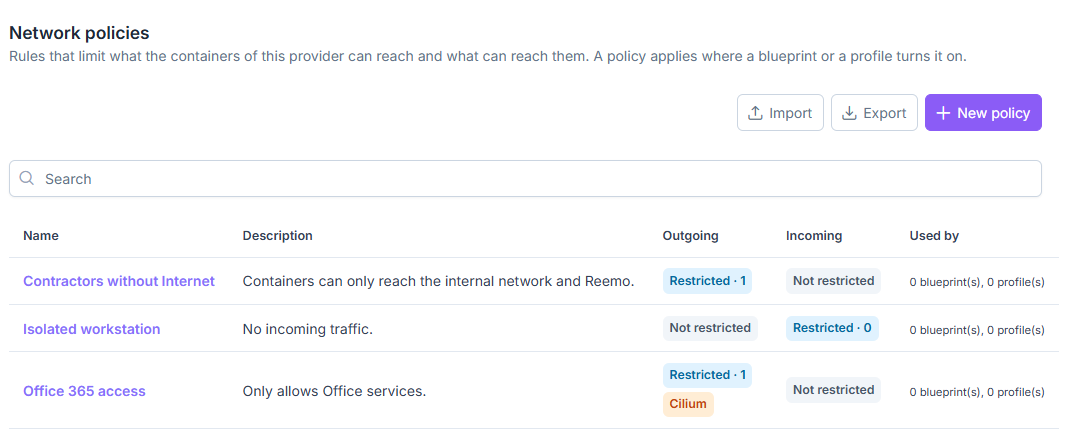
List of the network policies of a provider.
Form fields
Name: name of the policy, unique within its provider.
Description: text shown to organizations, even when the policy is locked.
Start from: fills in the form with Isolate the containers (no incoming traffic) or Block the Internet except Reemo (only the Reemo flows go out, see the note below).
Outgoing: Not restricted (default) or Restricted to a list of destinations. Each destination has:
an IP address, an IP range in CIDR notation (
10.20.0.0/16) or a domain name (*.office.com, which needs Cilium), entered withouthttp://: the form refuses this prefix;optional ports, separated by commas (
443, 3389);a protocol: TCP, UDP or Both.
Incoming: Not restricted (default) or Restricted to a list of sources. A source is filled in like an Outgoing destination, without domain names.
Site name check (HTTPS): Off (default), On or Forced. See Check the site name (HTTPS).
Switch to YAML: converts the form to YAML (the button becomes Back to the form). Enter only
kind(NetworkPolicyorCiliumNetworkPolicy) andspec: Reemo adds the selector, name, namespace and labels itself. Comments are not kept.
For example, with Outgoing set to Restricted to and no destination, the container only reaches the Reemo flows.
Note
A policy that restricts outgoing traffic always lets the Reemo flows through: the cluster DNS, the cluster relays and the entry points known to the instance (signal servers, secure gateways, relays, TURN servers, recording gateway). It also lets the Reemo TURN servers through when no TURN server is set for the instance. Without Cilium, Reemo resolves these names to addresses when it applies the policy. A profile in fallback relay mode goes through the relay.
Turn on a policy
A policy only applies once it is turned on in a container blueprint or in a profile created without a blueprint.
In a container blueprint
From verified_user Admin Area > view_in_ar Containers & Workstations > architecture Container Blueprints, select the blueprint, then open the Network policies tab.
Click Add a policy.
Select the policy. Only the policies of the blueprint’s provider are offered.
(Optional) Click Locked next to the policy to unlock it.
A policy added to a blueprint is locked by default. Locked, it is enforced on the profiles created from the blueprint: the organization cannot remove it and only sees its name and description. Unlocked, it stays in these profiles, and the organization sees its rules and can remove it. For example, a blueprint that locks the Block the Internet except Reemo policy prevents the organizations that use it from restoring Internet access for their containers. To remove a policy from the blueprint, click Remove.
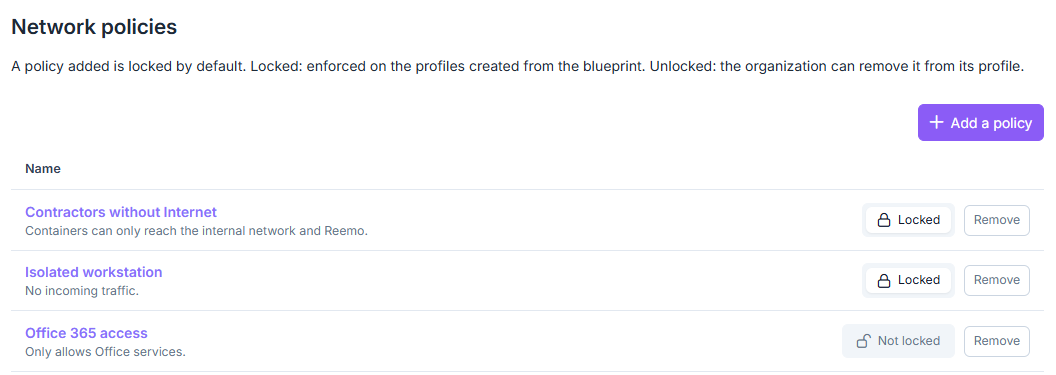
Network policies tab of a container blueprint: two locked policies and one that is not locked.
Warning
An organization can create a profile without starting from a blueprint. The locked policies of a blueprint do not apply to that profile: turn on a policy in the profile, as described below.
See also
Container Blueprints — Create a container blueprint and lock its settings.
In a profile without a blueprint
Only the instance administrator adds or removes the policies of a profile without a blueprint. The organization sees these policies and their rules, without being able to remove them.
From the organization, open inventory_2 Inventory > box_edit Container Profiles, select the profile, then open the Network policies tab.
Click Add a policy.
Select the policy. Only the policies of the profile’s provider are offered.
How changes apply
Any change (editing the policy, adding, removing, locking or unlocking) applies at once to the running containers, without a restart, and Reemo shows the result cluster by cluster. In a blueprint, it also applies to the profiles created from that blueprint. A cluster that does not answer gets the change at the next edit of the policy or the next start of a container that uses it, and a warning says so.
If the policies of a container cannot be applied, Reemo refuses to create the container. The user sees a message and the administrator receives the Container creation refused: network rules not applied alert. The possible causes are Cilium missing, unreachable cluster, refusal from Kubernetes or a provision-api version that is too old. A container with a policy that uses a domain name also fails to start on a cluster without Cilium that did not answer when the policy was saved.
Export and import policies
To copy policies to another provider, on this instance or another one:
In the Network policies tab of the source provider, click Export.
Click Copy to clipboard.
In the Network policies tab of the target provider, click Import.
Paste the text.
Click Import.
To export a single policy, open it, then click Export at step 1. Otherwise, the export holds all the policies of the provider.
The export holds the name, description and rules of each policy, in JSON format, but not the blueprints and profiles where it is turned on. On import, Reemo checks each policy as when it is created: a policy is not imported if its name already exists on the target provider or if one of its clusters refuses it. The window lists these policies with the reason.
Duplicating a blueprint to another provider does not copy its policies.
Delete a policy
In the Network policies tab of the provider, select the policy.
Click Delete.
A policy still turned on in a blueprint or profile cannot be deleted. The Used by section of the policy shows where it is used. Deleting a provider deletes its policies.
Check the site name (HTTPS)
With Cilium, a domain name destination allows the addresses that name resolves to. Another site served at the same address (for example behind the same CDN) therefore gets through too: *.wikipedia.org lets Wikifunctions and Wikidata through, as Wikimedia serves them at the same address. The site name check narrows this gap: on port 443, Reemo also verifies the site name the browser announces at the start of the HTTPS connection, without decrypting it.
Turn on the check
In the Network policies tab of the provider, open the policy.
Under Outgoing, in Site name check (HTTPS), choose On.
Click Save.
The state of each cluster appears in this field (see Cluster states). Choose Forced rather than On if the Cilium version of a cluster is unreadable. The check covers the domain name destinations of this policy, applies at once to the running containers and is part of the policy export.
Cluster states
Reemo reads the Cilium version of each cluster and shows one of these states:
Check available: the cluster has Cilium 1.16.12 or later (1.16 branch), 1.17.6 or later (1.17 branch), or 1.18 and above. On applies the check on this cluster.
Version too old for this check: the interface shows the Cilium version of the cluster (for example “Cilium 1.16.3”). Reemo does not apply the check on this cluster, even in Forced mode. Upgrade Cilium.
Version unreadable: the account Reemo uses cannot read the
ciliumDaemonSet of thekube-systemnamespace. Give it this right (get), or choose Forced to apply the check anyway.Cluster unreachable: Reemo cannot reach the cluster, so it cannot read its Cilium version.
Warning
In Forced mode, if the Cilium of a cluster with an unreadable version is too old, all HTTPS traffic to the allowed domain names is blocked there.
Limits
The check only covers port 443 over TCP. QUIC traffic (HTTP/3, over UDP 443) to these names is blocked, which brings browsers back to classic HTTPS, and the other ports stay checked by address.
The verified name is the one the client (browser or program) announces: a malicious program can announce an allowed name, then connect to another site served at the same address.
When a policy is switched to YAML, Reemo applies the serverNames field as is, without checking the Cilium version.